Let’s explore how you can integrate Okta with Jira and, more importantly, why this integration can be a game-changer for your projects. Connecting Okta to Jira is more than just syncing user data; it’s about enhancing your project management capabilities.
Whether you’re overseeing a support team, managing IT services, or striving to streamline operations, this integration can significantly improve your workflow. It turns Jira issues into more than just tasks by infusing them with valuable context and insights.
The benefits of connecting Okta to Jira
Connecting Okta to Jira enriches the data within your Jira issues, making it more actionable. Imagine handling a large volume of service requests and needing to identify key stakeholders quickly. With Okta integrated, you can automatically populate Jira issues with essential details like user roles, departments, or managerial contacts. This streamlines your workflow by providing immediate context.
For example, you might want to display users’ email addresses directly in Jira or use attributes stored in Jira’s custom fields to build complex JQL queries, automate processes, set up queues, and generate detailed reports. By integrating Okta, all of this becomes possible, transforming your Jira issues into powerful information hubs.

Consider another scenario: managing IT service management (ITSM) requests. With Okta connected to Jira, you can effortlessly bring in additional information about the person assigned to a task or the one reporting an issue. This ensures that the right information reaches the right person at the right time, all without manual intervention.
In short, integrating Okta with Jira is not just about connecting systems; it’s about enhancing the value of the information within your Jira issues.
Understanding Okta’s role in Identity Management
Okta is a leading identity and access management solution, designed to manage identities and access across all applications and resources, whether they’re cloud-based or on-premises. Its reliability and widespread adoption make it an excellent choice for organizations looking to secure their user management processes.
As organizations grow, the need for a scalable, robust solution like Okta becomes clear. It provides a secure and flexible way to manage user identities, making it a cornerstone of modern identity management practices.
Steps to integrate Okta with Jira
Jira Cloud doesn’t natively support connections to user directories. To achieve this, Atlassian Access is required. But don’t worry: integrating Azure Active Directory with Jira Cloud can be done in just a few minutes. All you need to do is follow a few steps below. Fortunately, integrating Okta with Jira Cloud is straightforward and can be completed in a matter of minutes by following a few simple steps.
The flexibility of Atlassian tools, whether it’s Jira or Jira Service Management, allows you to customize these products to suit your organization’s specific needs. You can easily extend their functionality by selecting the appropriate apps from the Atlassian Marketplace. To simplify the process of connecting Okta to Jira Cloud, we’ve developed an ideal app. This app not only handles the integration effortlessly but also plays a strategic role in gathering and utilizing valuable information. Consider giving Mindpro Sync a try — it’s designed to make this integration smooth and beneficial. Check it out here.
Mindpro Sync is your weapon to integrate Okta with Jira
Within the Atlassian Marketplace, there is an app for anyone looking to make integrations like this. So why is Mindpro Sync so special for these types of situations? Because it allows you to easily bring in essential user attributes, such as department, roles, or even manager details, and display them right inside your Jira tickets.
What you are looking for is not just to link two systems, it’s to supercharge your Jira issues with the power of detailed, real-time user information pulled straight from Okta. So, forget about manual data entry or endless searches for the right contact info. With Sync, it’s all automatically populated where you need it most.
Whether you’re assigning tasks or creating reports, Sync gives you the flexibility to select what data to display, making your workflows smarter and faster.

What sets Sync apart is how seamlessly it integrates with Jira’s native capabilities. Using the synchronized user attributes, you can create JQL queries, automation rules, queues, and detailed reports.
Imagine instantly sorting tickets by department or manager to prioritize work or setting up automations that auto-assign approvals based on user hierarchy. Mindpro Sync will help you with that and more. Plus, it works across Jira Service Management, too, so your support team can easily access critical data without lifting a finger. It’s like giving your Jira tickets a powerful upgrade, transforming how your team interacts with their projects and tasks.
What information from OKTA will you be able to bring to Jira issues?
Once you’ve set up your connection, you’ll be able to show the following Okta user attributes directly in Jira with Mindpro Sync. Default OKTA user attributes:
- City
- Cost Center
- Country code
- Department
- Display name
- Division
- Employee number
- First name
- Honorific prefix
- Honorific suffix
- Last name
- Locale
- Manager
- Manager ID
- Middle name
- Mobile phone
- Nickname
- Organization
- Postal address
- Preferred language
- Primary mail
- Primary phone
- Profile URL
- Secondary mail
- State
- Street address
- Time Zone
- Title
- User type
- Username
- Zip code
Custom OKTA attributes:
Okta lets you map any custom attributes you create in user profiles. Want to learn how to create custom attributes in Okta? Just click here! Once you’ve set up your custom attribute, you’ll see it listed in the Profile Editor in Okta. Pretty straightforward, right?

After that, the custom attribute will be ready and waiting in the user profile, so you can easily add whatever content you need to it. Simple as that!

Good to know: Once you’ve created your custom attribute in Okta, it’ll automatically be available in Mindpro Sync for mapping, using its short name. No extra setup required. Easy peasy!
Steps to integrate Okta AD to Jira
Let’s get down to the nuts of making this integration happen.
Step 1: Install the Sync App
First things first, you’ll need the Sync app from the Atlassian Marketplace. This is your bridge between Okta and Jira. To get started, you can install Sync directly from the Atlassian Marketplace:
- Head over to the Mindpro Sync product listing on the Atlassian Marketplace and click on Try it free.
- Choose the site where you want to install the app, click Start Free Trial, and you’re all set.
Alternatively, you can use the Universal Plugin Manager (UPM) to install Mindpro Sync on your Jira site:
- Open the Apps drop-down menu in Jira and select Explore more apps.
- Search for Mindpro Sync, and once it appears in the search results, click on it.
- Click Try it free, then Start free trial, and you’re good to go.
Keep in mind: Both installation methods require administrator permissions to add the app to your Jira instance.
Once you’ve installed the app, you can get to the Mindpro Sync configuration screen in a couple of ways. Right after installation, just click on the Getting Started option, or use the app shortcut by going to Jira Settings > Apps > Mindpro Sync > Connections.
Step 2: Connect Okta to Jira
To set up a connection with Okta, just click the New Connection button on the Connections screen. A pop-up window will appear with a list of options, allowing you to choose the Identity Provider you’d like to connect to.

From the list of options, go ahead and select Okta as your Identity Provider. Then, just fill out the fields like this:
- Connection Name: Give your connection a name.
- Authentication Method: Choose how you want to authenticate your connection. Based on what you pick, the system will ask for credentials:
- API Token (default):
- Client URL: Enter your Okta domain URL. This is the one you set up when you created your Okta account.
- Client Token: Enter your Okta Client API Token (just remember, it expires every 30 days). Need help creating one? Click here to learn how.
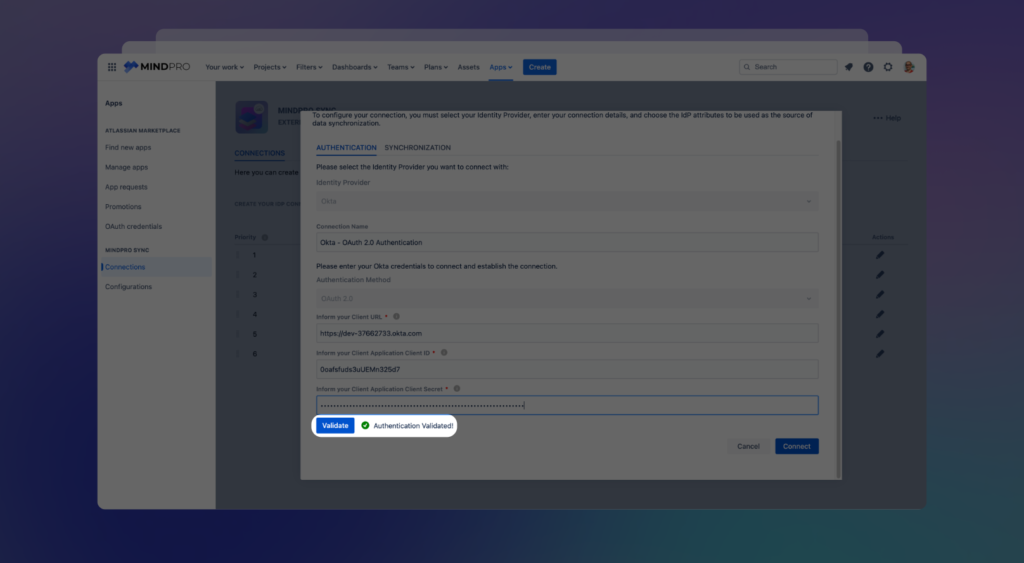
- OAuth 2.0:
- Client URL: Enter your Okta domain URL (this is the one you set up when you created your Okta account).
- Application Client ID: Provide your Okta Application Client ID.
- Application Client Secret: Enter the client secret that was created for the related application in Okta.
- Once you’ve entered everything, click Validate to test the connection. Okta will briefly open a blank pop-up window while it validates your info.
- If all goes well, you’ll see a green checkmark next to the button, letting you know the connection is good to go!
- API Token (default):
Connecting via OAuth 2.0 requires you to have an application already set up in Okta, along with the proper Client ID and Client Secret. Need help with this? Click here to learn how to configure it.
Once you’ve entered all the necessary info and clicked Connect, the system will validate the connection with Okta and let you know if anything goes wrong. When the connection is successfully established, you’ll see a “Success” message, and the Synchronization tab will be enabled, letting you move forward with syncing.
Step 3: Okta Data Synchronization
When you’re connected to Okta, the system will activate the Synchronization tab. Here, you can choose which attribute fields you want to sync with Jira, and also specify the attribute that holds the user’s manager information.
By default, the system automatically connects to the Email attributes, so you don’t have to do anything unless you want to. But if you’d like to sync using different IdP user attributes, just pick the one you want from the list and hit Save. Simple as that!

Keep in mind: The attribute you select for synchronization must contain a valid email address as provided in the IdP. Once you’ve made your selection, all users will have their data synced based on that attribute. So, make sure it’s the right one!
Step 4: Okta Connection
After you set up your authentication and selected the field for syncing data with Okta, you’ll see a new connection pop up in the list of connections. Here’s what you’ll find in that list:
- Priority – If you have multiple connections, you can set their priority order by dragging and dropping. This priority determines which connection will be the primary reference for pulling and displaying attributes if a user is found in more than one Identity Provider.
- Status – This shows whether the connection is currently connected or disconnected.
- Identity Provider – Displays the Identity Provider (like Okta) that’s being used for the connection.
- User match – Shows the attribute field you selected to be the key to sync data between the Identity Provider and Jira.
- Manager match – Indicates the attribute that holds the manager’s email or ID.
- Actions – This menu lets you edit the connection details, delete the connection, or disconnect it.

Keep in mind: Okta uses Admin profiles to manage and restrict user actions. When a token is generated in Okta, it carries the permissions associated with that admin profile. Depending on your specific permissions, you might encounter some limitations on which attributes you can view or map from Okta.
If that happens, the system will notify you during the authentication process, letting you know about any potential restrictions. For a smooth experience, we recommend that the admin has at least Org Admin permissions.
Step 5: OKTA – Configuring OAuth 2.0 authentication
To register the Mindpro Sync application in Okta, you’ll need to establish a connection via OAuth 2.0. This means you’ll have to register Mindpro Sync as a valid application within Okta. To do this, head to your Okta admin panel. From there, navigate to the Applications menu and select the Applications sub-item.

Next, click on the Create App Integration button.

A pop-up window will appear:
- In the Sign-in method section, choose OIDC – OpenID Connect.
- In the Application type section, select Web Application.

Once that’s done, you’ll see a New Application form. Here’s what to do:
- Add a name for your application (for example, “Mindpro Sync”).
- In the Grant type section, make sure to check the Refresh Token checkbox.

Scroll down the form and, in the Sign-in redirect URIs section, enter the following URL: https://adconnector.mindproapps.com/okta/auth

Next, scroll down again to the Assignments section, and choose Skip group assignment for now. Once that’s done, click Save.

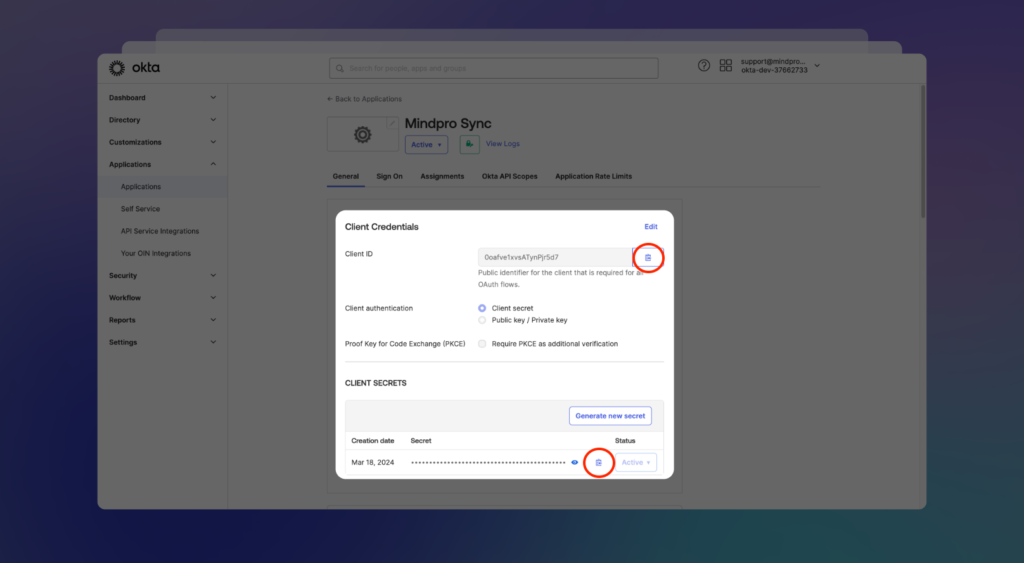
Once the application screen is created, go to the Client Credentials section, and click the Edit link next to the section title. Check the box for Require PKCE as additional verification and then click Save below the Client Secrets field.

Afterward, scroll down to the General Settings section and click the Edit link next to the section title. In the Refresh Token section, select Rotate token after every use and leave the grace period at 30 seconds.

Once you’ve completed the previous steps, click the Save button at the bottom of the form to save all settings. Now, head to the Assignments tab. Click on the Assign button and select Assign to People.

A pop-up window will appear, displaying a list of users. Select the users you want to give access to, and click the corresponding Assign link next to their names.

For each user you assign, a pop-up window will appear with their profile information. You can make optional edits here. Once you’re done, click the Save and Go Back button at the bottom of the window.

You’ll be redirected to the user’s list, where the assigned user will now be marked as Assigned. Repeat this process for all the users you want to grant access to the application, and when you’re finished, click Done.

Once you’re back on the Assignments screen, switch to the Okta API Scopes tab.

Scroll down until you find the okta.users.read option, and click the Grant link next to it.
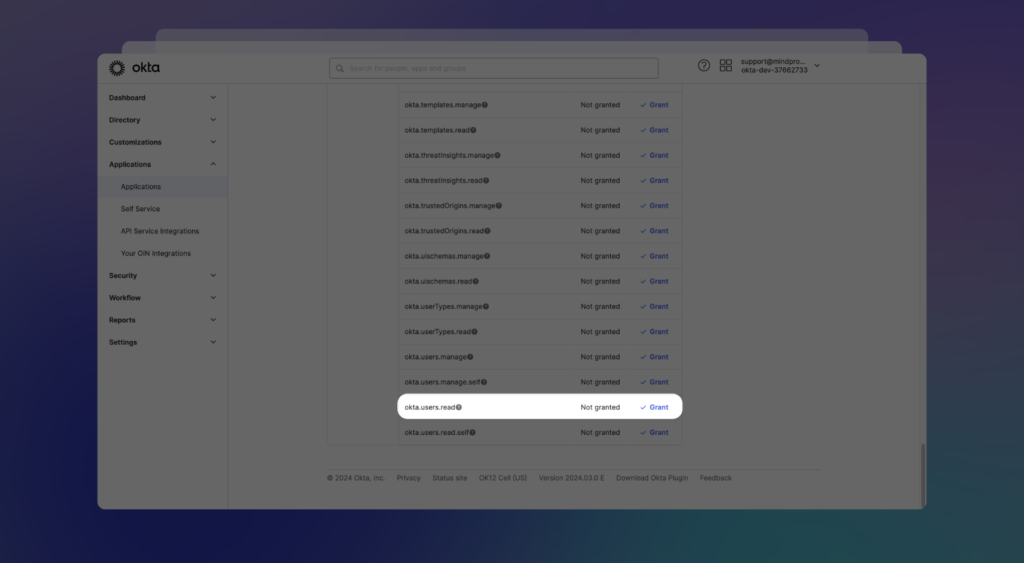
This permission level is the recommended one for users interacting with the application, but you can select additional permissions if your process requires them.
And that’s it! You’re all set. Now, go back to the General tab, and copy the credentials to use on the Mindpro Sync connection screen.
Did you get this far and everything went well? Congratulations! You’re good to go!
Why Mindpro Sync is the best tool for the job
Now, you might wonder: why use Mindpro Sync? Here’s the deal: Sync isn’t just another tool. It’s the only app in the Atlassian Marketplace that lets you integrate Jira with multiple Identity Providers (IdPs) like Okta, and also Azure AD, Google Workspace, or Onelogin. That’s a big deal if you’re working in a diverse IT environment.
Sync’s feature set is designed to boost productivity and streamline your workflow. For example, it can automatically assign approvers based on the user hierarchy or a dedicated workflow post function. Need to display user attributes inside Jira issues or directly in the Jira Service Management (JSM) portal? Sync’s got you covered there too. By connecting Okta to Jira with the Mindpro Sync app, you’re not just integrating two systems, you’re enhancing your entire IT service management process. And let’s be honest, who doesn’t want more practicality and productivity in their day?
So, if you’re looking to maximize your Jira and Okta integration, Mindpro Sync is hands-down the best choice available on the Atlassian Marketplace.