Let’s dive into how you can connect Azure Active Directory (Azure AD) to Jira, and, more importantly, why you’d want to do it in the first place. Well, think of it like this: integrating Azure AD with Jira doesn’t just bring your user data into Jira; it improves the way you handle information in your projects.
Whether you’re part of a support team, managing IT services, or just trying to keep things running smoothly, this connection can make your life a whole lot easier. It’s about making your Jira issues a whole lot more informative and useful.
Why bother connecting Azure AD to Jira?
Well, for starters, it’s all about making the data in your Jira issues richer and more actionable. Imagine you’re dealing with a flood of service requests, and you need to quickly figure out who’s who and who’s responsible for what. With Azure AD connected to Jira, you can automatically pull in crucial details like user roles, departments, or even the manager’s info directly into Jira issues. This way, you get the context you need right off the bat, without having to dig around for it.
Let’s say you want to view email addresses directly in Jira. Or maybe you want to leverage user attributes stored in Jira’s custom fields to create powerful JQL queries, automation, queues, and even detailed reports. Connecting Azure AD makes all of this happen. Suddenly, your issues aren’t just tasks—they’re loaded with context and actionable insights.
Another practical example? Picture this: you’re handling IT service management (ITSM) requests. When Azure AD is connected to Jira, you can automatically add more information about the assignee or the reporter. This ensures the right person gets the right information at the right time without anyone lifting a finger.
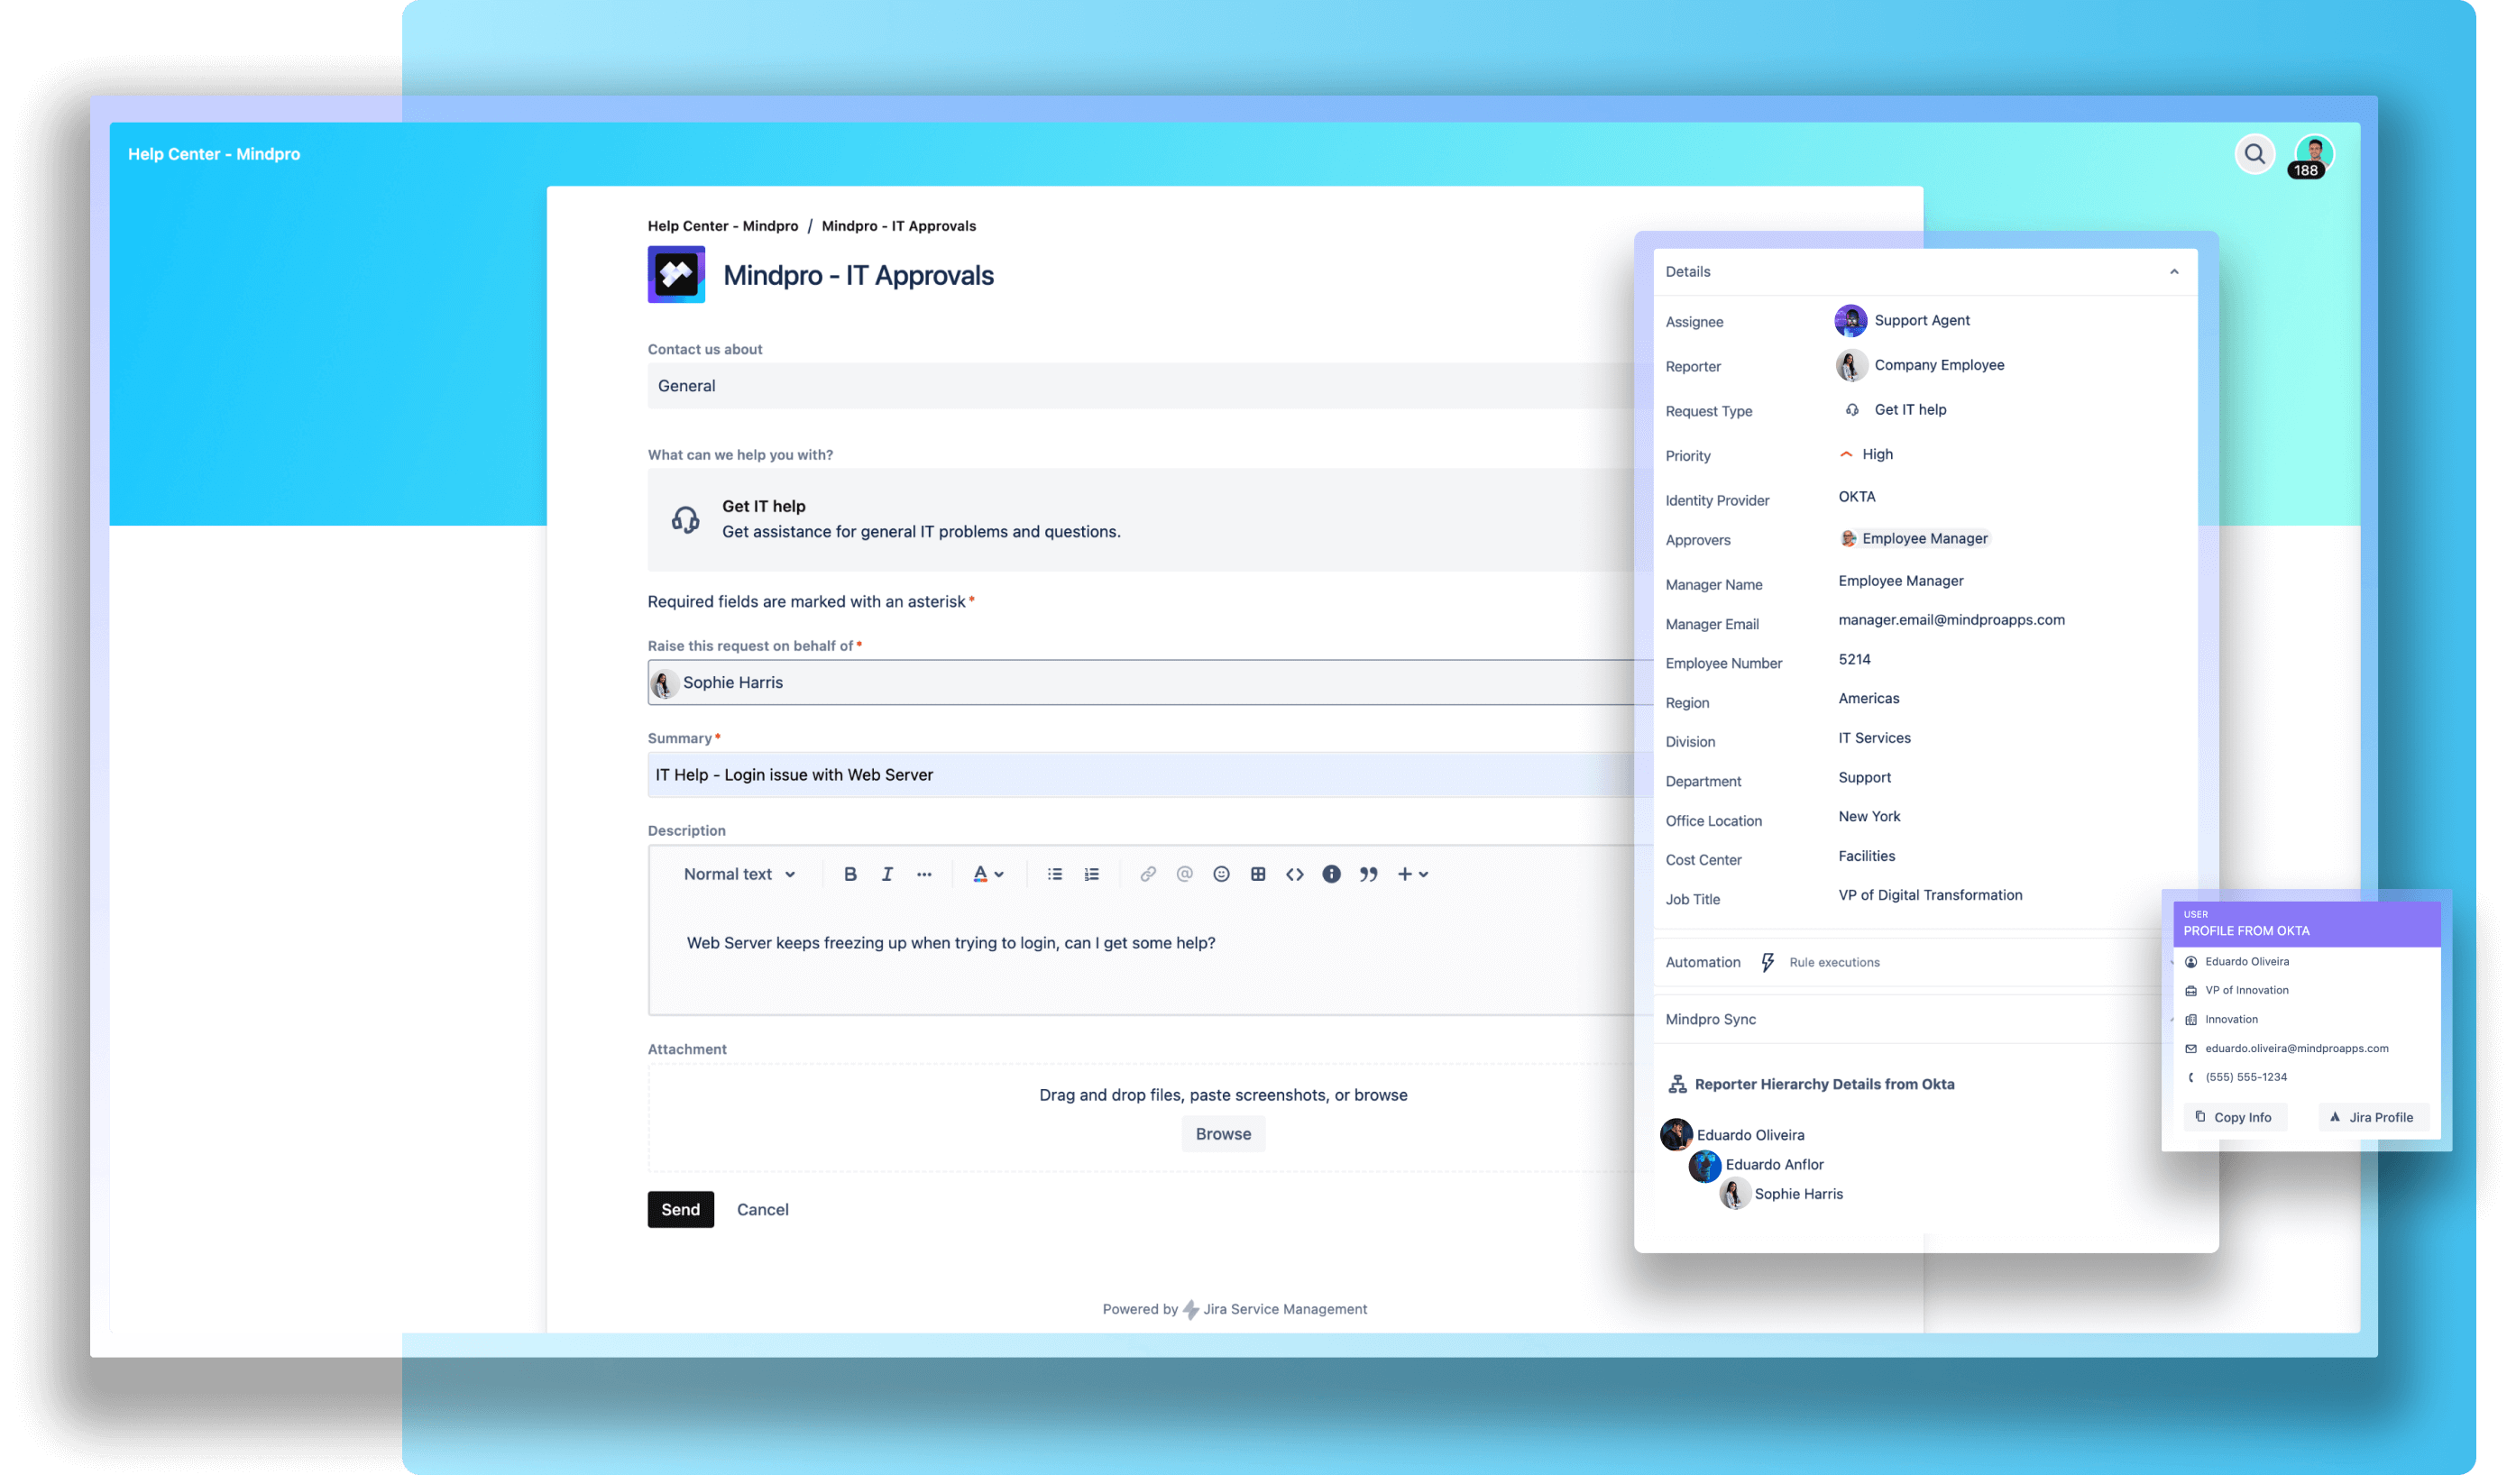
Integrating Azure AD with Jira isn’t just a technical task; it’s about bringing rich, valuable information right where you need it—in your Jira issues.
Is Azure AD being phased out? What’s the deal with Entra ID?
Let’s clear up some confusion about Azure right off the bat. Azure AD is still your go-to service for identity and access management, but some of the older methods of working with it are gradually being replaced by more modern solutions.
Now, you might be wondering about Microsoft Entra ID. Essentially, it’s just a new name for Azure Active Directory (Azure AD). The service itself hasn’t changed — it’s been rebranded to better represent its expanded role within Microsoft’s security lineup, which is now called Microsoft Entra.
Here’s an analogy: Azure AD was all about managing identity and access within the Azure Cloud ecosystem. Microsoft Entra ID, on the other hand, takes this a step further. It’s designed to manage identities and access across all your applications and resources, whether they’re in the cloud or on-premises.
How to connect Azure AD with Jira?
Jira Cloud doesn’t natively support connections to user directories. To do that, you’ll need Atlassian Access for. But don’t worry: integrating Azure Active Directory with Jira Cloud can be done in just a few minutes. All you need to do is follow a few steps below.
One of the standout benefits of using Atlassian tools is their flexibility. Whether it’s Jira or Jira Service Management, you can easily enhance these products by adding features that suit your company’s specific needs. To do this, simply head over to the Atlassian Marketplace and choose the app that’s the best fit.
To make the process of connecting Azure AD to Jira Cloud even easier, there’s an ideal app for this. It doesn’t just handle the integration seamlessly but also plays a strategic role in gathering valuable information. This is where Mindpro Sync comes into play — you’ll want to check it out.
Mindpro Sync is your secret weapon when connecting Azure AD to Jira
Within the Atlassian Marketplace, there is an app for anyone looking to make integrations like this. So why is Mindpro Sync so special for these types of situations? Because it allows you to easily bring in essential user attributes, such as department, roles, or even manager details, and display them right inside your Jira tickets.
What you are looking for is not just to link two systems, it’s to supercharge your Jira issues with the power of detailed, real-time user information pulled straight from Azure AD. So, forget about manual data entry or endless searches for the right contact info. With Sync, it’s all automatically populated where you need it most.
Whether you’re assigning tasks or creating reports, Sync gives you the flexibility to select what data to display, making your workflows smarter and faster.
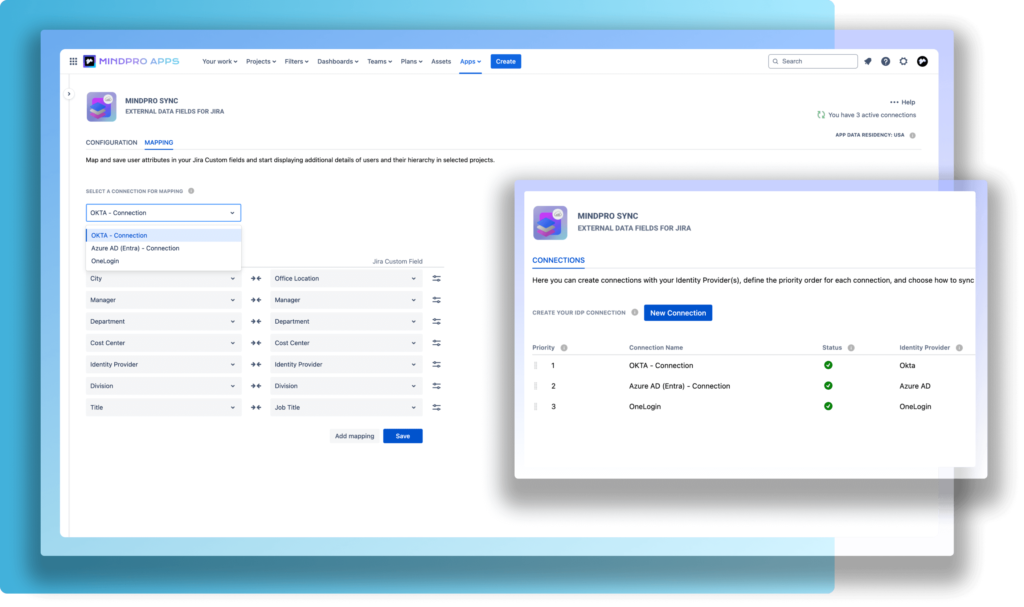
What sets Sync apart is how seamlessly it integrates with Jira’s native capabilities. Using the synchronized user attributes, you can create JQL queries, automation rules, queues, and detailed reports.
Imagine instantly sorting tickets by department or manager to prioritize work or setting up automations that auto-assign approvals based on user hierarchy. Mindpro Sync will help you with that and more. Plus, it works across Jira Service Management, too, so your support team can easily access critical data without lifting a finger. It’s like giving your Jira tickets a powerful upgrade, transforming how your team interacts with their projects and tasks.
What information from Azure AD will you be able to bring to Jira issues?
With Mindpro Sync, you can easily display the following Azure AD user attributes directly within Jira:
- Business Phones
- City
- Company Name
- Cost Center (only editable in Azure for Azure Enterprise accounts)
- Country
- Department
- Display Name
- Employee ID
- Fax Number
- Given Name
- Im Addresses
- Job Title
- Manager Email
- Manager Name
- Mobile Phone
- Office Location
- Other Mails
- Postal Code
- Preferred Language
- State
- Street Address
- Surname
- User Principal Name
Also, Azure AD Extension Attributes provide a way to store more data in the directory. They are added directly in the Graph API by the Azure admin and up to 15 extension attributes are possible to be added. Mindpro Sync supports extension attributes and allows users to map them in the mapping screen.
Steps to connect Azure AD to Jira
Let’s get down to the nuts of making this integration happen.
Step 1: Install the Mindpro Sync App
First things first, you’ll need the Sync app from the Atlassian Marketplace. This is your bridge between Azure AD and Jira.
To get started, you can install Sync directly from the Atlassian Marketplace:
- Head over to the Mindpro Sync product listing on the Atlassian Marketplace and click on Try it free.
- Choose the site where you want to install the app, click Start Free Trial, and you’re all set.
Alternatively, you can use the Universal Plugin Manager (UPM) to install Mindpro Sync on your Jira site:
- Open the Apps drop-down menu in Jira and select Explore more apps.
- Search for Mindpro Sync, and once it appears in the search results, click on it.
- Click Try it free, then Start a free trial, and you’re good to go.
Keep in mind: Both installation methods require administrator permissions to add the app to your Jira instance.
Step 2: Registering Mindpro Sync as an application in Entra ID / Azure AD
Before you start using the app, it’s important to register Mindpro Sync in your Entra ID / Azure AD instance. This will ensure that the necessary permissions are set, allowing the system to view and map the relevant attributes.
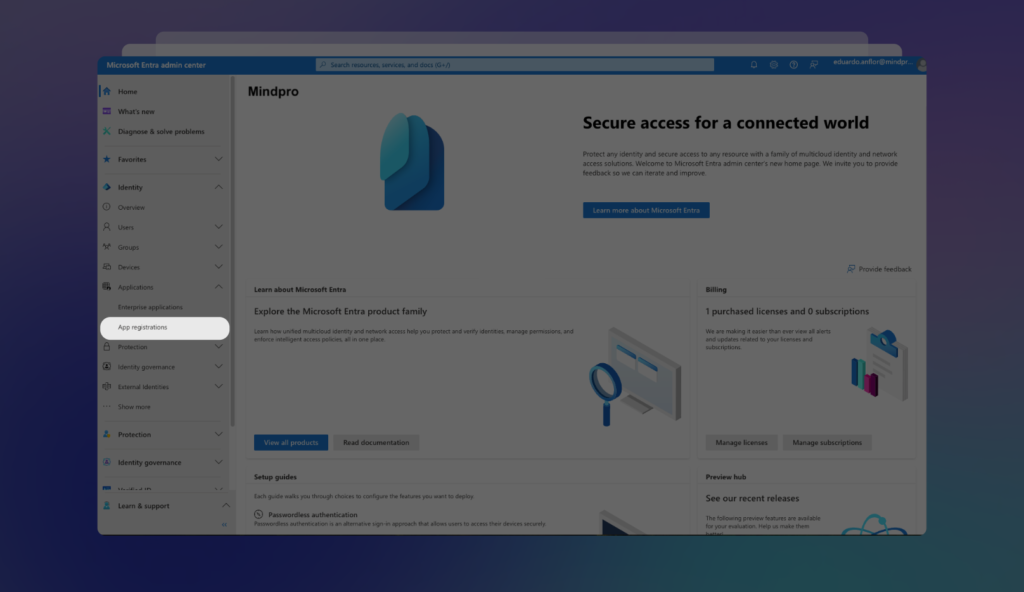
From the Entra ID / Azure main screen, follow these steps:
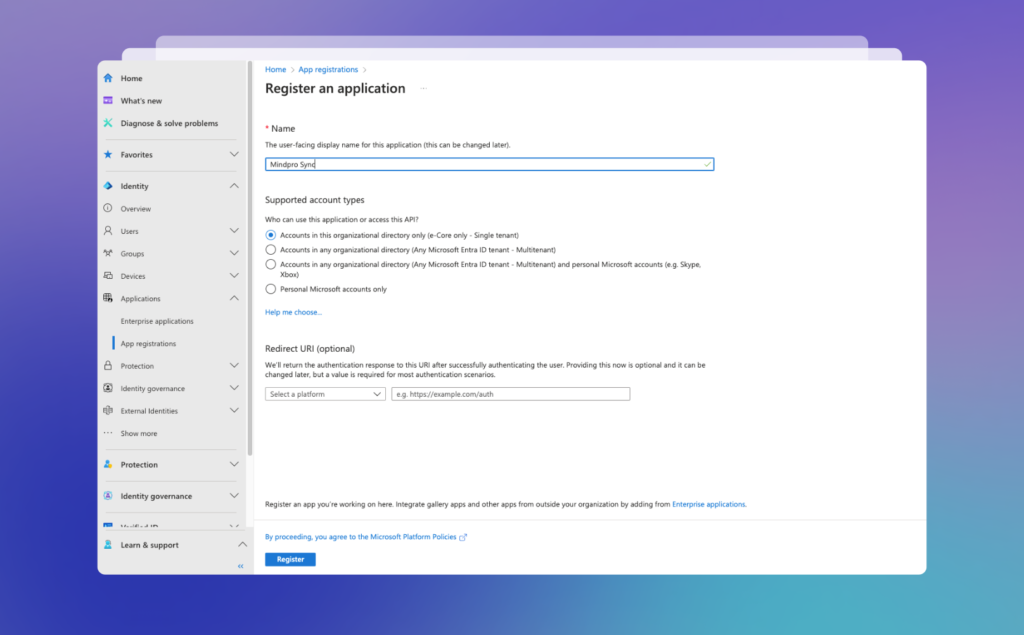
Select App Registration under the Applications section:
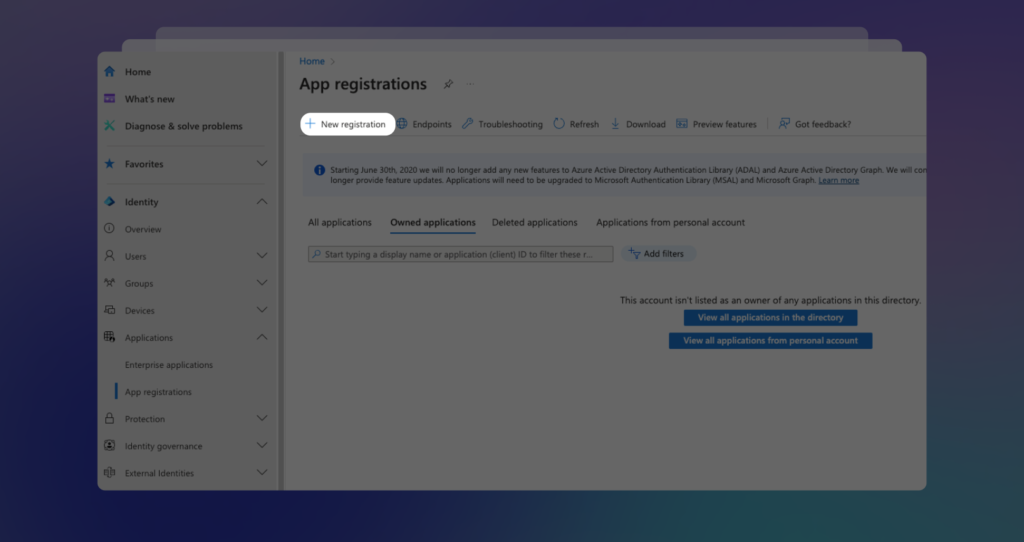
Next, click on + New Registration to move forward:
Enter the application name, leave all the options as they are, and click Register:
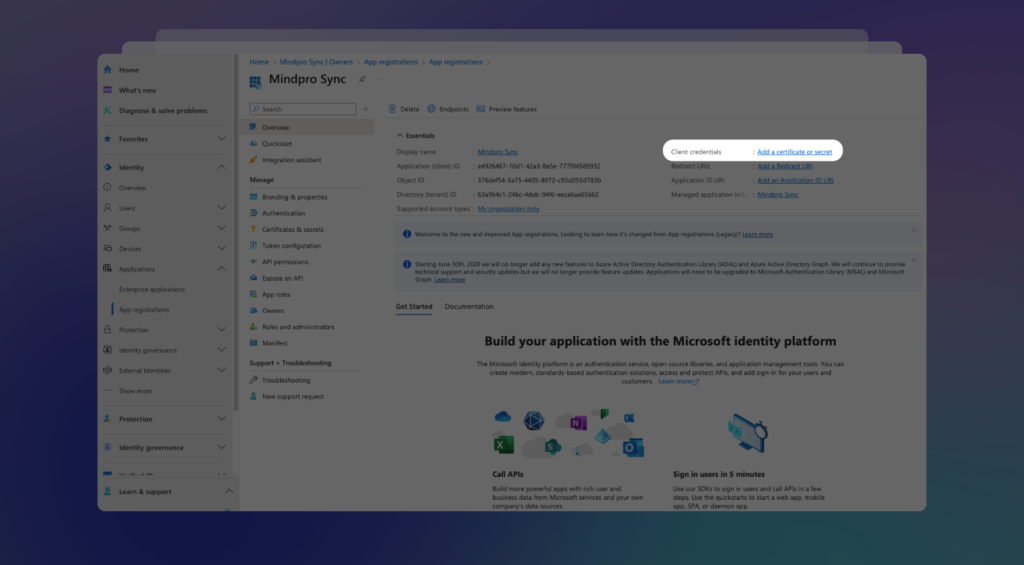
Once you’re on the newly created app’s Overview screen, click to add a new client secret:
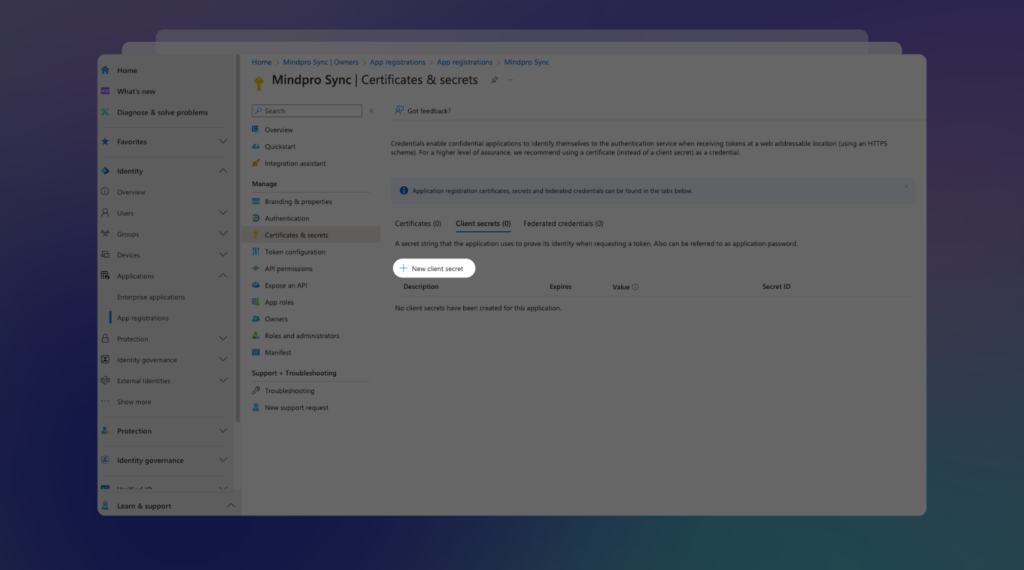
This will open the Certificates & secrets screen. Click on + New client secret:
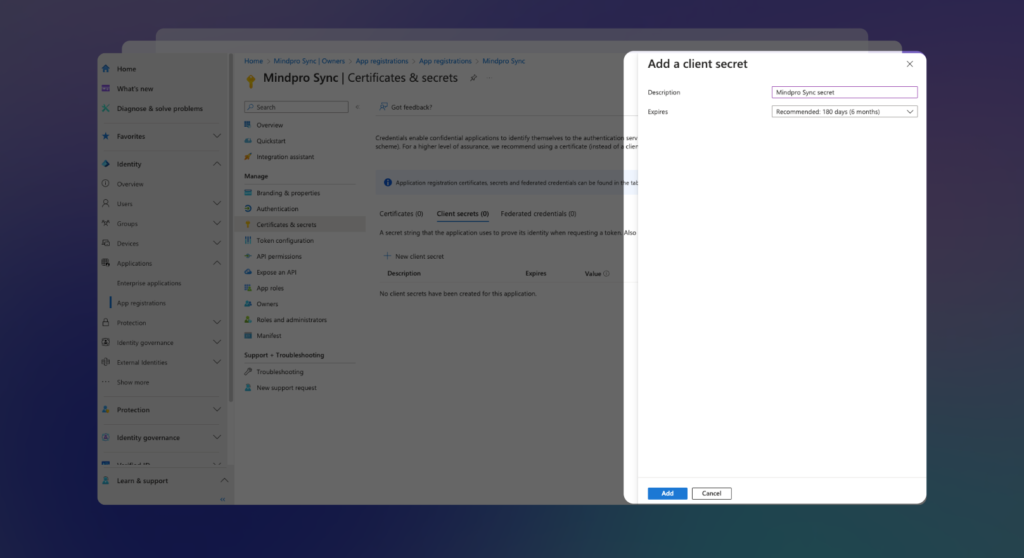
In the panel that appears on the right, enter a description for the secret, set the duration, and click Add:
Next, copy the content from the Value field and save it in a secure location for later use:
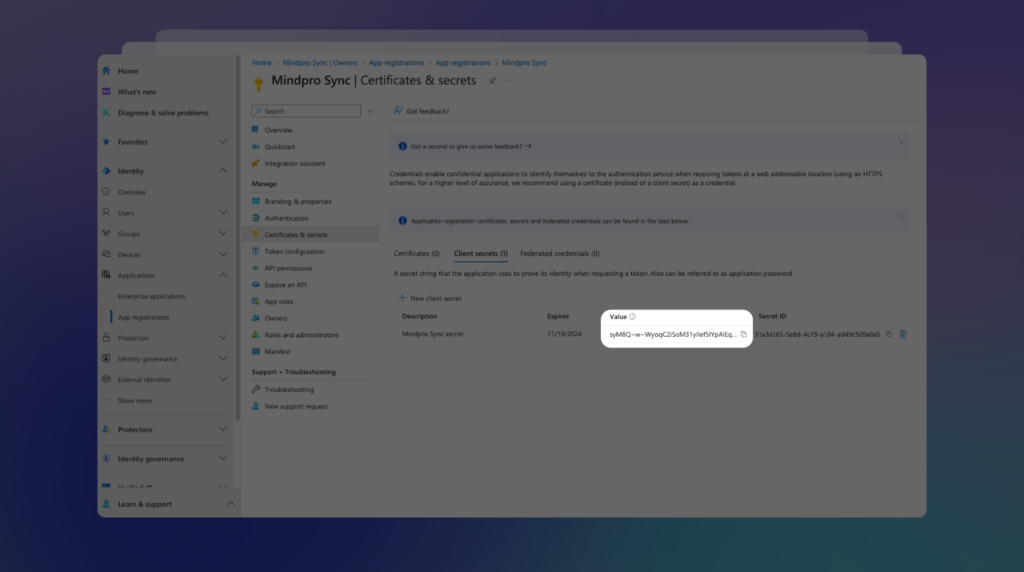
Important: If you don’t copy this value now, the next time you access this screen, the secret will be masked, and you might need to create a new one to retrieve the value.
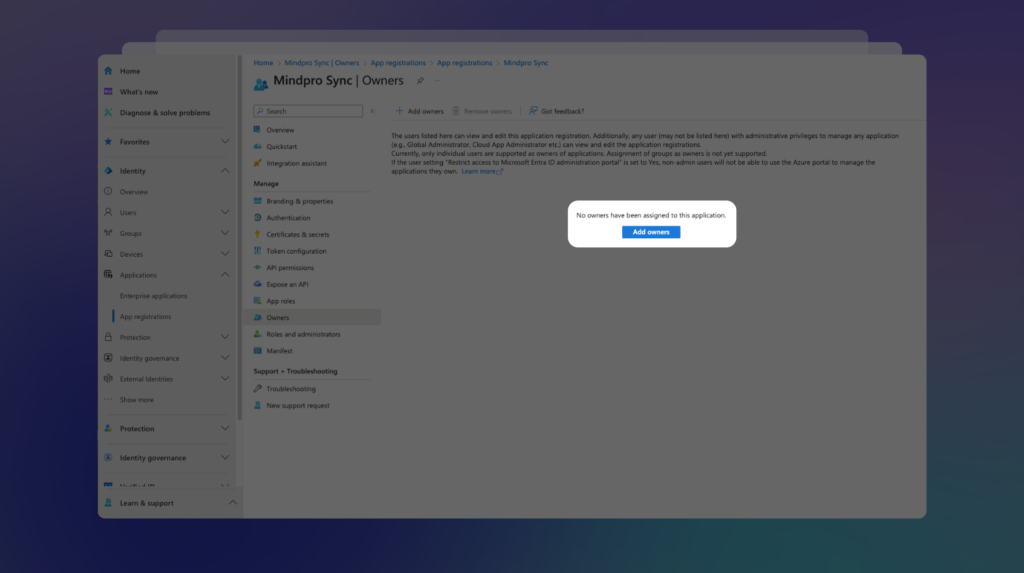
Afterward, click on the Owners option from the left menu, and then click Add Owners to assign the application to the appropriate users:
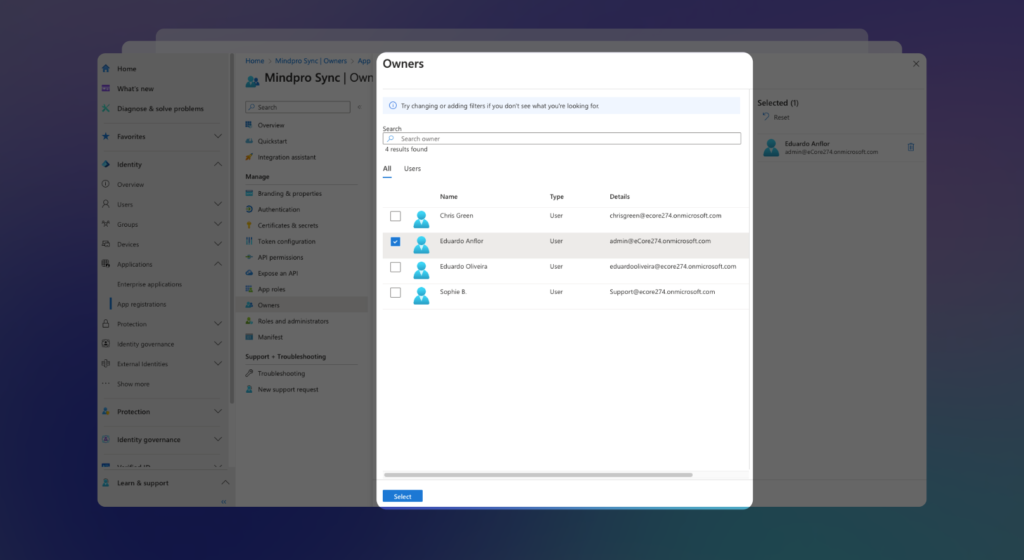
Select the users you want to assign to this application and click Select:
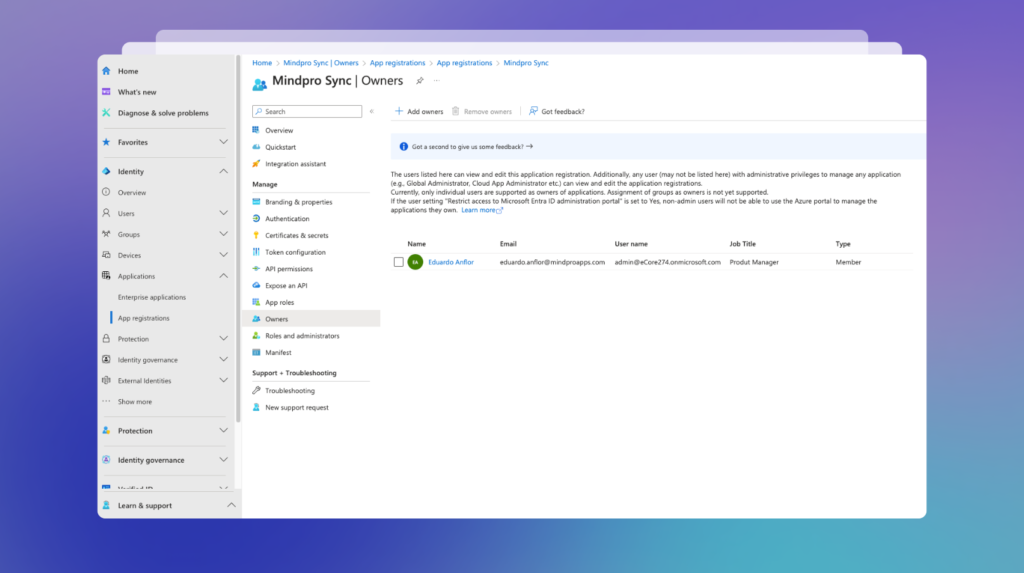
The users you selected will now be added to the list:
Step 3: Setting permissions for the application
Start by clicking on the App Registration option from the left menu and selecting the application you want to configure (the example below is just a suggestion):
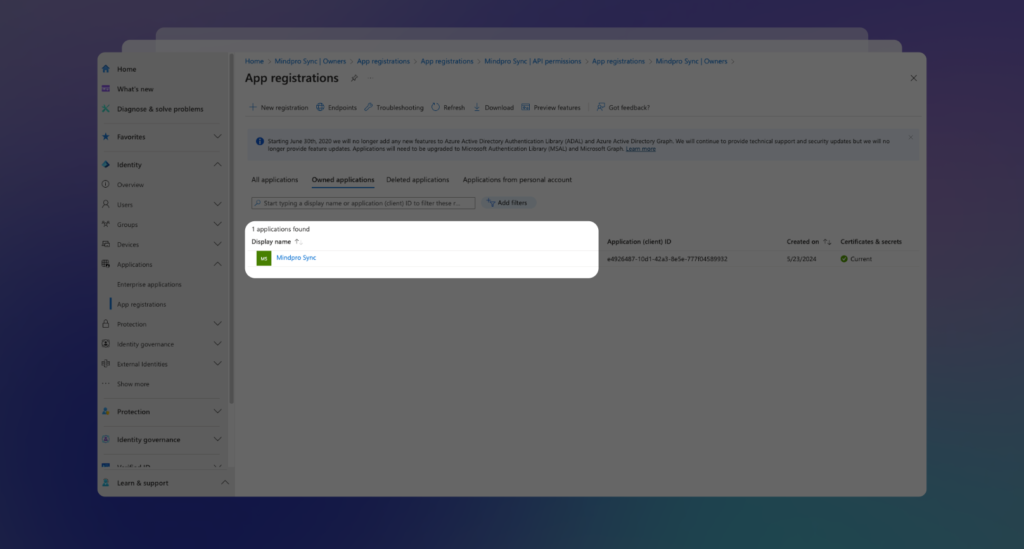
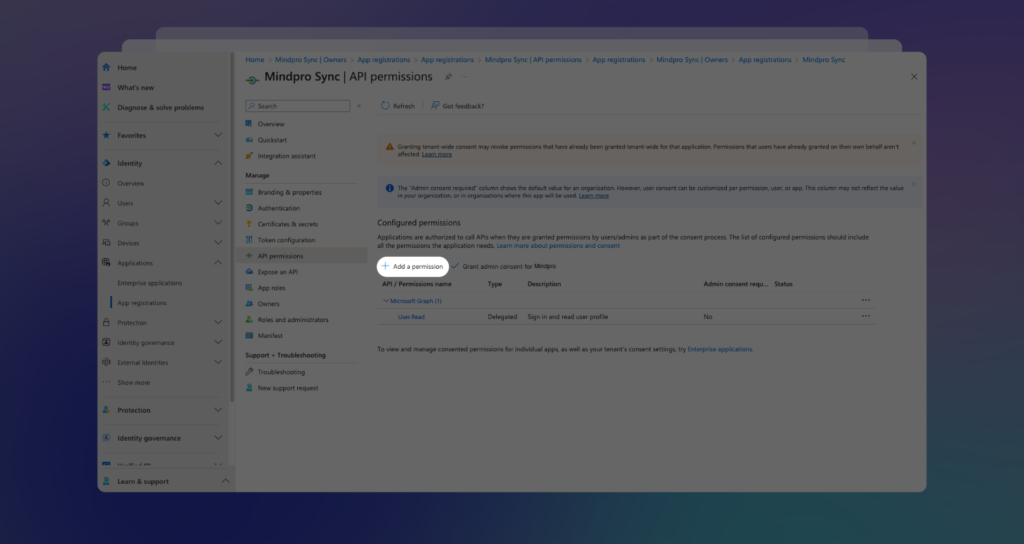
Once you’re on the Application screen, select API Permissions from the left menu. You’ll see the current permissions listed. If there aren’t any, click on + Add Permission:
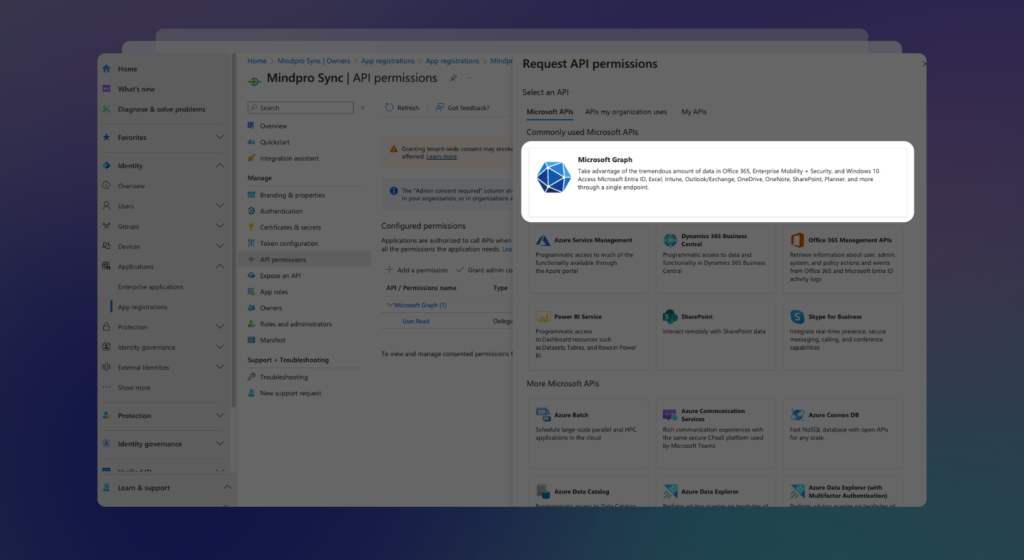
From the right pop-up menu, choose Microsoft Graph, then select Application Permissions as shown below:
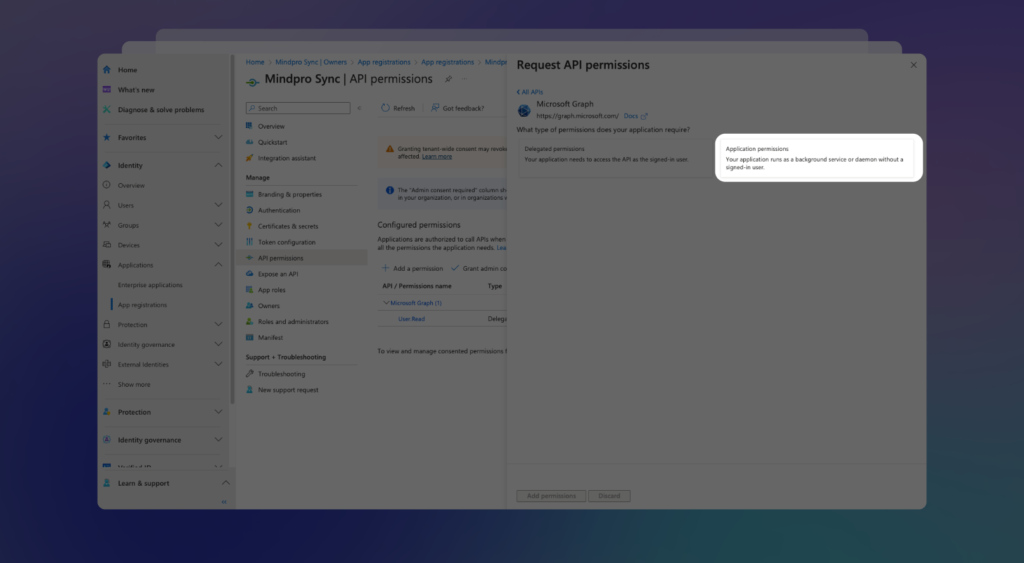
Find the User option, expand it, and check the User.Read.All checkbox. Then, click on Add permissions:
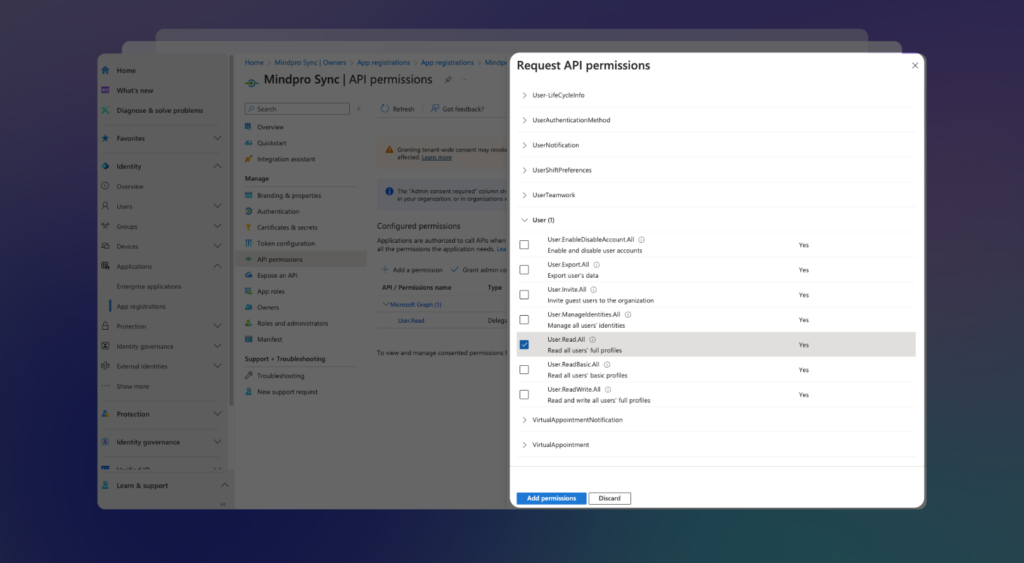
Pro Tip: If you work with Extension Attributes in Entra ID / Azure AD, it’s a good idea to select the User.ReadWrite.All checkbox as well. This will allow Mindpro Sync to read these fields during the mapping process.
Back on the permissions screen, be sure to grant Admin consent to your company, directory, or user by clicking on Grant admin consent for…. The system will then update the permissions:
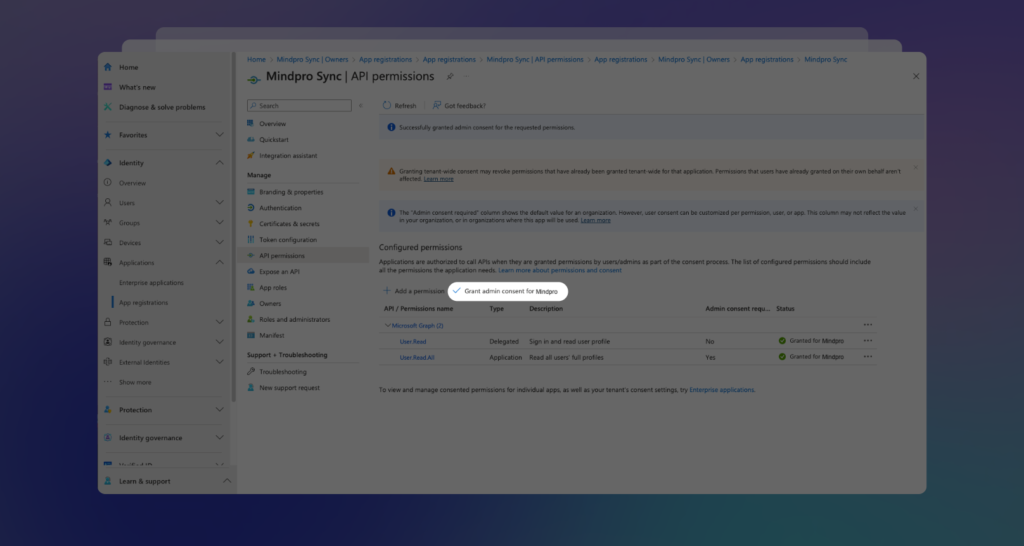
Once you’ve completed these steps, your Entra ID / Azure AD will be configured with the necessary permissions to work with Mindpro Sync.
Good to Know: These are the minimum permissions required for Mindpro Sync to map your attributes from Entra ID / Azure AD. Depending on your internal policies, you might want to add additional permissions, such as Directory.Read.All.
Step 4: Accessing the Mindpro Sync App
Once you’ve installed the app, you can access the Sync configuration screen in two ways: right after installation via the Getting Started option or by using the app shortcut through Jira Settings > Apps > Mindpro Sync > Connections.
Here’s a quick overview:
After accessing the app, getting started with Mindpro Sync is straightforward.
To establish a connection with Azure AD, click on the New Connection button on the Connections screen. This will open a pop-up window with a list of options where you can select the Identity Provider you wish to connect to.
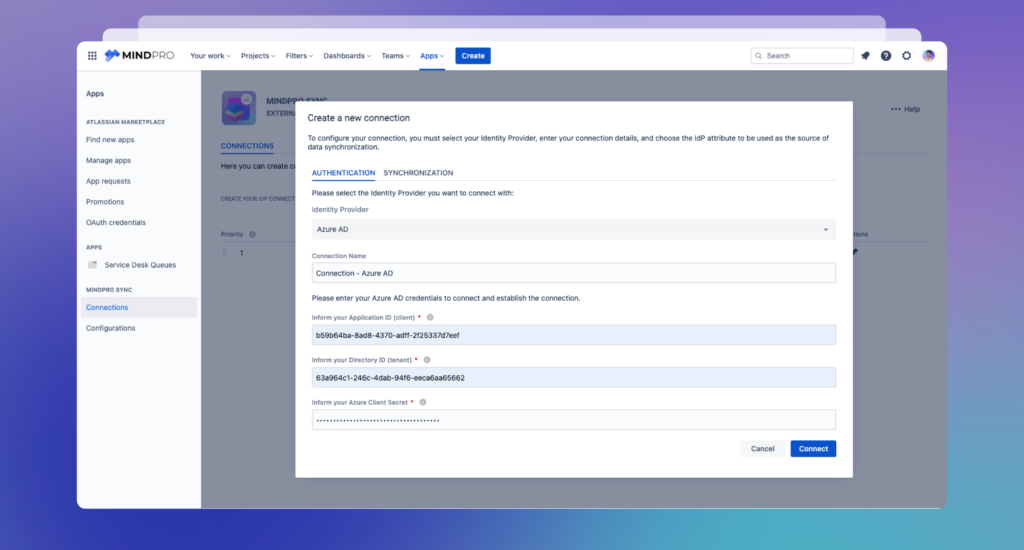
From the available options, choose Azure AD as the Identity Provider and fill out the following fields:
- Connection Name: Enter a name for your connection.
- Application (Client) ID: Enter the Azure AD Application ID. Azure Active Directory allows you to create applications and service principals that can be used with role-based access control. This is useful when you have applications, hosted services, or automated tools that need to access or modify resources. Learn more here.
- Directory (Tenant) ID: A tenant represents an organization — a dedicated instance of Azure AD that you receive when starting a relationship with Microsoft (e.g., signing up for Azure or Microsoft 365). Learn how to set up a tenant in Azure AD here. If you already have a tenant, here’s how to find it in Azure AD.
- Client Secret: This is the client secret password. If you don’t have one yet, here’s how to create it.
After entering all the required information, click Connect. The system will validate the connection with Azure AD and notify you if any issues arise.
Once the connection is successfully established, you’ll see a “Success” message, and the Synchronization tab will be enabled.
Step 5: Azure AD Data Synchronization
Once you’ve connected with Azure AD, the system will enable the Synchronization tab. Here, you can select which attribute fields to sync with Jira, including specifying the attribute that holds the user’s manager information.
By default, the system automatically connects to the Email attributes, so no further action is needed unless you want to use different IdP user attributes for data synchronization. If that’s the case, simply choose the desired attribute from the list and click Save.
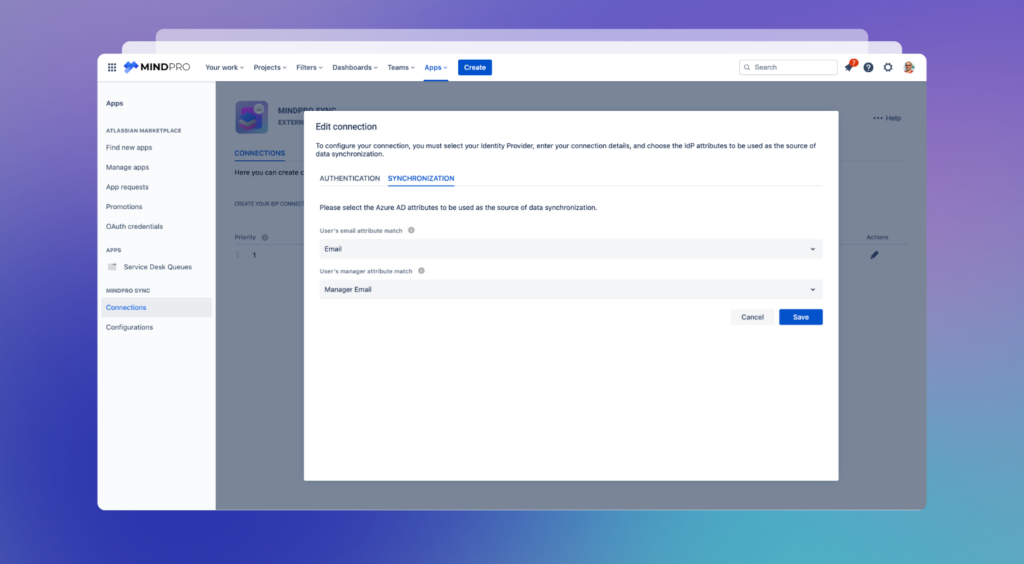
Keep in Mind: The attribute fields you select for synchronization must contain a valid email address as provided in the IdP. Once chosen, this attribute will be used to synchronize all users’ data.
Step 6: Azure AD Connection
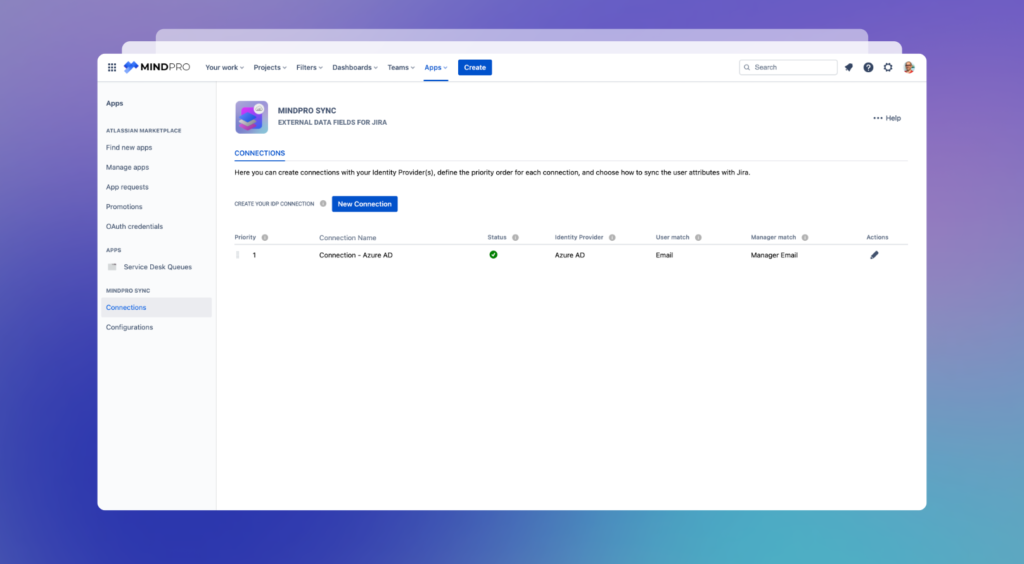
After you’ve set up your authentication and selected the field for data synchronization with Azure AD, you’ll see a new connection listed in the Connections tab. This list provides the following information and options:
- Priority: If you have multiple connections, you can set their priority order by dragging and dropping them. The priority determines which connection will be the primary source for pulling and displaying attributes when a user is found in two or more Identity Providers.
- Status: Displays the current status of the connection, indicating whether it’s connected or disconnected.
- Identity Provider: This shows which Identity Provider is being used for this connection.
- User Match: Indicates the selected attribute field used as the key for data synchronization between the Identity Provider and Jira.
- Manager Match: Displays the attribute that contains the manager’s email or ID.
- Actions: Provides a menu with options to edit the connection details, delete, or disconnect the connection.
Did you get this far and everything went well? Congratulations! You’re good to go.
Why Mindpro Sync is the best tool for the job
Now, you might wonder: why use Mindpro Sync? Here’s the deal: Sync isn’t just another tool. It’s the only app in the Atlassian Marketplace that lets you integrate Jira with multiple Identity Providers (IdPs) like Azure AD, and also Okta, Google Workspace, or Onelogin. That’s a big deal if you’re working in a diverse IT environment.

Check out our article about the Top Identity Providers to connect with Jira, by clicking here.
Plus, Sync’s feature set is designed to boost productivity and streamline your workflow. For example, it can automatically assign approvers based on the user hierarchy or a dedicated workflow post function.
Do you need to display user attributes inside Jira issues or directly in the Jira Service Management (JSM) portal? Sync has you covered there too.
By connecting Azure AD to Jira with the Mindpro Sync app, you’re not just integrating two systems, you’re enhancing your entire IT service management process. And let’s be honest, who doesn’t want more practicality and productivity in their day?
So, if you’re looking to make the most out of your Jira and Azure AD integration, Mindpro Sync is hands down the best choice available on the Atlassian Marketplace.

